PART 6 - UPGRADING YOUR OLD COMPUTER - WINDOWS 10
| PART 1 - UPGRADING YOUR OLD PC PART 2 - MEMORY AND STORAGE PART 3 - PROCESSOR AND INTERNET PART 4 - PERIPHERALS PART 5 - LICENSING & STARTING PART 6 - INSTALLING WINDOWS 10 PART 7 - CLEANING UP |
Your old computer has more memory (if you increased it) and is running Windows 10, though on its old hard drive. Now in this final step you'll remove the old hard drive, install a new solid-state drive and re-install Windows 10 onto it. Here's how:
| DISCLAIMER: IF YOU OPEN UP YOUR COMPUTER YOU NEED TO USE COMMON SENSE AS THERE ARE ELECTRICAL COMPONENTS INSIDE. DON'T OPEN THE COMPUTER IF IT'S PLUGGED IN. BE CAREFUL WHEN WORKING INSIDE IT. THE COMPUTER IS POWERED BY LOW VOLTAGE BUT THE POWER SUPPLY CONTAINS LETHAL VOLTAGE AND SHOULD NEVER BE TAMPERED WITH. I AM NOT RESPONSIBLE FOR YOUR ACTIONS OR YOUR FAILURE TO TAKE PRECAUTIONS. ADDITIONALLY I AM NOT RESPONSIBLE IF YOU MESS UP YOUR COMPUTER OR LOSE DATA. BACK UP ANY DATA ON THE COMPUTER BEFORE ATTEMPTING ANY UPGRADES IF YOU NEED THE DATA. FYI IN MORE THAN 30 YEARS OR WORKING WITH COMPUTERS I'VE NEVER HAD ANY PROBLEMS WITH ELECTRICITY INSIDE THEM, BUT I NEVER WORK INSIDE A PLUGGED-IN COMPUTER. UNPLUG AND BE SAFE! |
First, disconnect and open up the computer. Remove the old hard drive. This usually involves 2 or 4 screws on each side (or the bottom) and unplugging the power and data connectors.
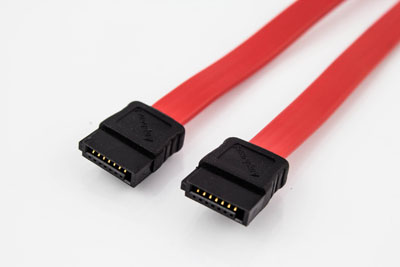
Then plug the SATA data cable into the SSD and into the motherboard (use the same SATA cable if the hard drive you're removing was a SATA drive). Then plug in the SATA power cable. If your computer is old, it may only have old power connectors that look like this:

It's called a 4-pin molex connector.
Unfortunately SATA drives require a power connector like this:
What to do? Head on over to Amazon and look for a molex to SATA adapter. Here's one for $2.25:

Plug the Windows 10 thumb drive installer into a USB port on the computer. Now you've got to manipulate the computer to boot off the thumb drive installer. Turn on the PC. If you're really lucky, the computer will boot off the only available boot device which is the thumb drive (the SSD is blank) but probably not. You're going to have to make it boot off the thumb drive. In some computers, continually pressing the F12 key while it starts brings up a boot menu showing all available boot devices in the system, then you simply select the thumb drive. This is the easiest way and you might try a few F keys to see if you get to a boot menu with any of them (F12 down to F9). If none of these work, you're going to have to play with the BIOS / CMOS settings.
Get into the computer's CMOS by hitting F1, F2 or the DEL key while it's starting. I usually hit all three repeatedly as I don't want to look up the correct one. Sometime it'll tell you while it's starting "Hit F2 for setup". But usually trying all 3 will work. Here's what I had to do to get mine to boot off the thumb drive:
No F key worked to bring up a boot menu and when I let it try to boot it just hung forever. So I went into the CMOS & saw that it had options to define the first boot device, that is, the device that the computer will try to boot from (below).

Being 15 years old, the options were a little dated. There was no USB drive, the USB options were USB-FDD (floppy disk drive!), USB-ZIP (that's on old one) and USB-CDROM. I tried the

computer set to all three and none of them worked. If you look near the top of the screen above you'll see an option "Hard Disk Boot priority". When I went into that one I hit the jackpot, as not only did the computer "see the USB installer drive (Kingston Data Traveler left) but the computer "saw" my solid state drive, the OCZ-ARC100, so there was a great chance that the installation would work. I changed the Kingston USB drive to the first position, that is, the computer would try to boot from that device first.

That did the trick...it started to boot from the thumb drive. First thing it came up with is this:
The computer determines that it is 64-bit capable and selects it...this is a final test of whether the PC can handle 64 bit, it's entirely unnecessary but a nice confirmation of our previous work. So then you're at the Windows installation start.
 Skip activation
 When selecting the operating system that you want to install, make sure its the same version of the operating system as the previous version of Windows. If you don't do this then it won't transfer the digital license, as you only have a license for the version of your earlier operating system. For example, my Windows 7 installation was Windows Home Premium:
 Windows 10 does not have a "Premium" option but the software placed itself in the one that matches closest:

Now accept the license agreement in the next screen. After that, you want to select the Custom option.
 You'll then be presented with this screen:
 What you need to do is select the partitions one-by-one and delete them. You can see below that one was deleted and there is now 222.9 GB's of unallocated space.

Once you get rid of them all it's all unallocated space.

With the unallocated space selected, click the "New" button; you'll see the size of the partition to be created on the bottom and have a chance to change it (but leave it alone!):

Click the 'Apply" button. You'll see:

Say OK and it'll go ahead and re-partition the disk. You'll wind up with this:

Now you've got two partitions on the drive. The bulk of the space is in partition 2, but there's 579 MB's (megabytes, not gigabytes) in partition 1. This is not accessible and used for Windows system files. Hit next...

...and it starts installing onto the SSD. It'll then boot into Windows 10 and you'll have to answer some configuration questions. One of my many pet peeves is that Windows 10 no longer let's you install to a local account (one on just your computer) but now demands a Microsoft account; you either provide one or create one on the spot for them. I don't want to do this, I want to give Microsoft (and Google and Facebook, and Twitter...)as little information as humanly possible. Consequently when you see this screen:...

...simply unplug the Ethernet connection on the back of the PC and hit the back arrow in the upper left corner of the screen (or never connect to WIFI during the installation process) and you'll then see this:
 Why what a surprise! Microsoft is going to let us install the computer with a local account. Thank you! The only other installation screen I'll comment on is this one:
 The so-called "Privacy" settings are anything but and I turn them all off. Windows 10 is a vacuum cleaner sucking up all your information and funneling it to Microsoft. Don't bend over backwards by helping them do it. Of course by not using some of these options you won't be able to avail yourself of some of the features of Windows. But for me the balance tilts WAY too far in Microsoft's favor. I don't want Windows to know my minute-by-minute location. I don't want it to recognize my speech. I don't want to be served personalized ads (or any ads at all for that matter). You can't even turn off them sending "Diagnostic data" back to Microsoft, you can only dial it back to "Basic". Turn all these off and dial it as far back as you can until there's realistic privacy laws in effect that prevent internet technology giants from surveilling us 24x7. End of editorial, now back to the show.

We finally made it...a clean and new copy of Windows 10 installed for free on the solid state drive your old computer which has been speeded up with some simple and inexpensive solutions (compared to the cost of a new machine).